Issue #67: Rough Puff
A Simple, Delicious Cheater's Puff Pastry
The weather gods always seem to want to remind us that summer is over the day after Labor Day. As I type, it’s been raining here in New York for eight hours straight and there’s no end in sight. I guess I shouldn’t complain. Our Labor Day Weekend weather was ideal. I was inspired to do a lot of cooking and preserving, not that it takes much to move me in that direction. I even made rough puff several times. If you are the sort of person who likes to listen to podcasts while you cook, tune into this week’s episode of What’s Burning for which I interview the warm, charming, and funny Mexican culinary authority, author, and television host Pati Jinich. Thank you for your continued support.—Mitchell
No, Rough Puff is not the name of a leather night at a gay bar, as one of my friends joked. Rough puff is the way Brits refer to a sort of cheater’s puff pastry, pâte feuilletée, that makes a frequent appearance on The Great British Bake Off, where time usually does not allow contestants to use a more traditional French technique making the classic laminated dough.

I’ve been watching Britain’s competitive home bakers make rough puff for years now. But I only decided to make it myself a few weeks ago. I came across an Italian Reels in my Instagram feed that featured a savory, starburst-shaped zucchini and mozzarella tart. I was intrigued by the shape and excited to find another use for zucchini, which, in its gargantuan form, continues to occupy an entire drawer in our refrigerator. For some reason, perhaps simply because it was in Italian, this IG recipe seemed more legit to me than most. It called for puff pastry, which I didn’t have or want to buy. Like my friends on GBBO, I didn’t have the time to make it, either. So, I scanned the BBC website for a recipe for rough puff and got to work.

Truth be told, this was not my first experience with faux feuilletage, which is really just a high-butter-content pie dough you fold, or “laminate,” as you would for traditional puff pastry.
More than 30 years ago, my sister Carrie and I held a private “boys against girls” puff pastry bakeoff. We were food geeks ahead of our time. It didn’t start out as a competition. I was house sitting for a friend’s parents in their beautiful new home in north Toronto with an expansive kitchen that had more counter space than I’d seen in my lifetime. One night, Carrie and I decided to make use of those extra-wide counters by making our first puff pastry from scratch. While I was studying in Paris during my junior year of college, Carrie visited me for a week. We did our best to consume all of the layers of laminated pastry we could find in the City of Lights—mille-feuilles, croissants, palmiers, vol-au-vents, et plus.

Back home, for our night of baking experimentation, I chose to follow Jacques Pépin’s directions for classic feuilletage from his masterful La Technique, a cookbook I once told a journalist I would take with me to a desert island. Carrie used a recipe for Queen Julia’s ersatz puff pastry from one of her Julia Child & Company volumes. This was before we'd heard the term rough puff, but we were no less determined. It was the boys against the girls. The competition was on.
With Jacques as my guide, I mixed flour, water, and a little butter to form a dough, la détrempe, that I used to envelope an overly generous amount of butter I beat into submission with a rolling pin. Carrie rubbed and cut her butter into her flour and amalgamated it all into a rich dough. We both rolled and folded and rolled and folded our doughs to create the myriad layers that, when the pastry is placed in a hot oven, release enough butter and steam to force them to separate and rise. We baked our pastries together, standing in front of the wall-oven window to watch while they puffed.

In the end, my traditional puff pastry rose a little higher and a little more evenly than Carrie’s rough puff. But not by much. Mine had a slightly more resilient texture; hers was more melt in the mouth. They were both delicious. We declared it a tie.
Over the years since, I’ve made traditional puff pastry several times. I’ve laminated countless biscuits and sticky buns (Issue #41), folding butter between layers of different doughs so that they will expand and rise. But I haven’t had homemade rough puff since that night.
Until this month.
While I would no longer say that rough puff is as good as a fine French pâte feuilletée (see Exhibit B: the Galette des Rois, above), I will say that it’s a pretty quick, easy, impressive, and delicious dough for any home cook to master. What’s more, because the proportions are so simple, equal parts by weight of butter and flour, a pinch of salt, and a little cold water, you can make as much or as little as you need, which eliminates waste and extra effort. Without any sugar, it works for savory or sweet. And if you don’t roll it out too thinly, and you let it bake in a hot enough oven for long enough, you and your dining companions will almost certainly be impressed by the results.

RECIPE: Rough Puff Pastry
Using the ratio of equal parts flour and water by weight, choose the amount of dough you need.
For a single galette or tart shell:
135g (10 tablespoons, 1 ¼ sticks) unsalted butter, chilled
135g (about 5 ounces or 1 cup) all-purpose flour
Pinch salt
¼ cup cold water
For two galettes or double crust or turnover:
270g (20 tablespoons or 2 ½ sticks) unsalted butter, chilled
270g (about 10 ounces or 2 cups) all-purpose flour
Pinch salt
1/3 cup cold water
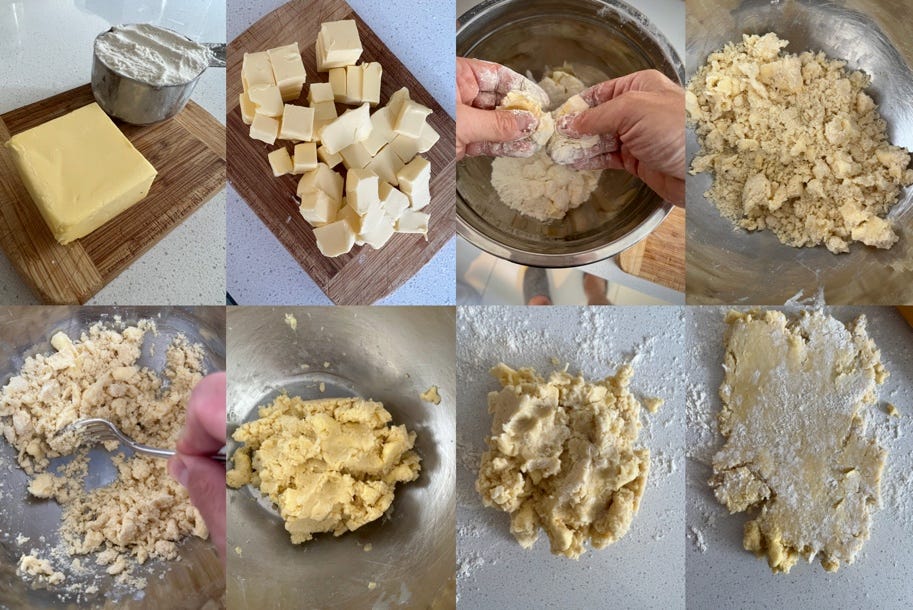
Cut the butter into small, ½-inch cubes and chill until ready to use.
In a large bowl, combine the flour and salt. Drop in the butter, toss it in the flour, and work it by pressing the cubes between your fingers and thumbs and rubbing the butter into small crumbs. The butter doesn’t have to be even, in fact, it’s best if the pieces vary in size to ensure flakiness later. You don’t want the butter to soften so much that it melts into the flour, so don’t over work the dough, especially if it is warm in your kitchen. When you are done, there should be large and small pieces of butter, the flour should look like yellowish crumbs, and, the whole thing should be shaggy. If you really worked the butter hard, you might want to chill the mixture for 10 minutes or so to firm up.
Working with the back of a fork, dribble in just about half or a little more of the cold water while pushing the mixture together to form clumps of dough. Don’t worry if all of the flour isn’t incorporated. Turn this mixture out onto a clean work surface, scraping out everything from the bowl. Press the dough together with your hands to form a solid brick or puck. If you need a little more water so that all of the flour coheres, dribble it in very sparingly.
Depending on the texture of your dough at this point, which will depend on the temperature of the butter when you finished working it in, I like to give it one turn if I can. To do that, flour the work surface and the dough and roll it out into a long rectangle. Fold the rectangle in thirds like a business letter—you may need to use a bench scraper or spatula to release it from the work surface—and then wrap it in plastic wrap and refrigerate it for at least 20 minutes. This rolling and folding is calls a “turn.” Don’t worry if it looks misshapen and messy. As you continue to fold or turn the dough it will take a neater form. Although it pains me to leave a messy work surface, I usually keep the flour on the counter until I’m finished with all my folds.
After the dough has set and chilled, remove it from the refrigerator. Flour the surface again, and roll it out and fold it in thirds. Then do all that again. Cover and chill another 20 minutes or so. Repeat this twice more, chill the dough, and it is ready to use.
Some Notes
Ingredients
I prefer all-purpose flour to pastry flour in my rough puff because I find the higher protein content makes for more discernable layers and a better final texture. I also prefer European-style butter (cultured and with a higher butterfat content) if I can find it. Both the flavor and the texture improve with better butter.
Using Rough Puff
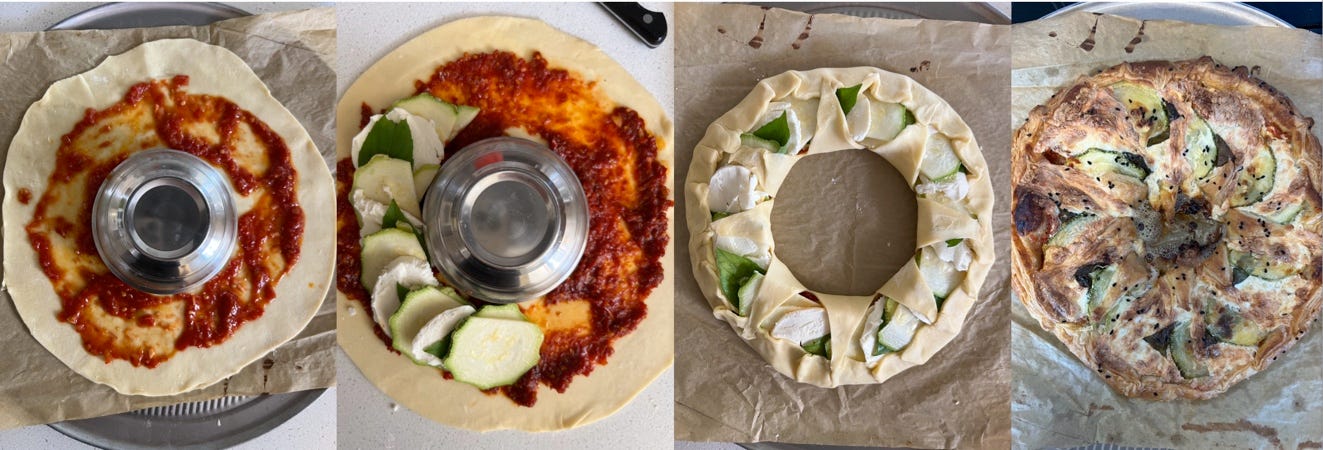
So far, my favorite way to use rough puff is as a base for a freeform tart or galette, savory or sweet. The puff makes just about anything you do with it “fancy.” I don’t really use recipes for these things, preferring instead to employ what I have on hand, combining flavors and textures I think will go well together. A few things to keep in mind:
Don’t roll the dough too thin or the layers won’t puff. About ¼ inch is ideal. If you roll the dough thinner it will still be delicious, but it will be more like pie crust than puff.
Be sure to transfer the dough to a parchment-lined baking sheet before you shape or fill it. I forgot to do this twice, filling and shaping it on the counter. By the time I realized my mistake, I had a disaster on my hands. The dough was too soft and too weighed down to transfer. I had to throw the whole thing in the garbage and start again.
The finish on the dough is enhanced by a simple egg wash (egg, water, salt) brushed on any exposed dough before baking. You can sprinkle on seeds, sugar, cheese, or whatever you want on top as garnish, but the egg wash is key.
Whatever you are making with rough puff, it is important to start in a hot oven, amply preheated, in order to get the steam you need for the layers to rise and the butter to melt away. I’ll start at 400°F. or 425°F., letting the dough bake until it really rises and starts to brown before I lower the oven to finish baking.
There is nothing worse than underbaked puff pastry. Just ask Mary Berry (“No soggy bottoms!”). Achieving the right doneness will take longer than you think, and I believe in this instance, it is always better to err on the side of too much time in the oven rather than too little.
Avoiding overly wet fillings will help you avoid soggy bottoms, too. Open-face tarts baked in a hot oven allow for the evaporation of liquid that helps the bottoms crisp.
Serving Suggestions
Zucchini, Mozzarella, and Basil Sunburst Tart

Peach, Raspberry, and Frangipane Sunburst Tart

Good luck!


